MISSILE LAUNCHER?! Did I misread that?

No, this is for real. We are not talking about the crazy rockets launched by flying drones, although it uses the same concept fundamentally.
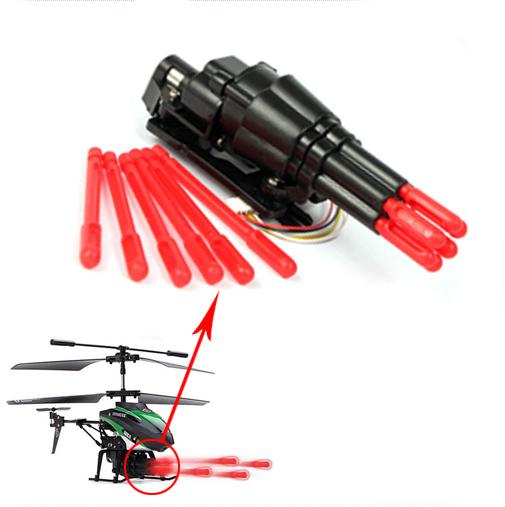
This toy comes from a spare part for V398 RC helicopter manufactured by WLtoys. It quite exciting that we decided to take the launcher, hack it and connect it to a Raspberry Pi GPIO pins and control it with Python 3. It can shoot up to 3 meters at around 50km/h.
 Here is how we figured it out:
There are 4 wires attached to a white connector: yellow, white, black, and red. To get to the juice of it, cut the connector, so you can play with each wire individually.
We tested black and red and can’t think of any use for them, so we are going to ignore them.
What we are interested in is the yellow wire that can connect to a relay, and controlled by the Pi’s GPIO pin logical signal. If the yellow wire got connected to a 5V power source, this device would launch the plastic missiles. The DC motor would trigger a switching mechanism to open the bullet spring holders and release the bullets. The longer it rotates, the more bullets it will shoot.
A relay will basically switch a circuit on / off with 3 pins: NO – Normally Open, COM – Common Conneciton, and NC – Normally Closed.

Launcher to relay wiring:
- Connect the launcher yellow wire to relay NO.
- Connect the 5V power source (this could be the Pi +5V pin) to relay COM.
- The launcher white wire to a shared GND on the Pi.
- If you send HIGH to logic pin, COM and NO will contact up and thus turn on the launcher motor, and vice versa,
- If you send LOW to logic pin, COM and NO will disconnect and thus turn off the launcher motor.

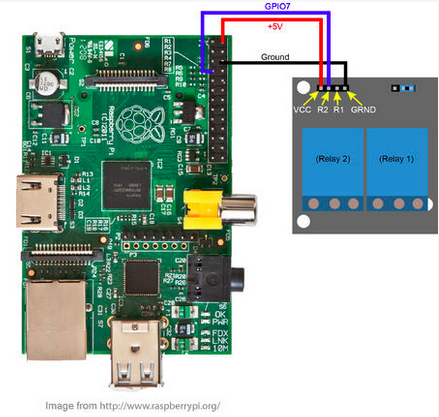
Relay board to Pi wiring:
- Connect the relay logic blue wire to GPIO pin 7.
- Connect the relay board VCC red wire to Pi GPIO +5V pin to power it up.
- Connect the relay board GND black to Pi GPIO GND pin.
Make sure you connect the ground wires correctly and don’t get mix up between the two. You may add a small diode to prevent any unwanted voltage going backward to the GPIO pin.
After you got it all set up. You can write a simple python script to test the circuit like the following:
import RPi.GPIO as GPIO   #import the GPIO library
import time

#  V398 missile launcher  by Dipto Pratyaksa
#Connect a blue wire with the GPIO pin 7
#Connect a red wire with GPIO +5V pin
#Connect a black wire with GND

class Launcher(object):
 def __init__(self):
  GPIO.setmode(GPIO.BOARD)
  GPIO.setwarnings(False)
  self.launcher_pin = 7 #set to GPIO pin 7
  GPIO.setup(self.launcher_pin, GPIO.OUT)
  print("Launcher ready")
 def shoot(self, mode):

  if(mode==1):
    print("Shooting a bullet")
    GPIO.output(self.launcher_pin, True)
    time.sleep(0.3)
    GPIO.output(self.launcher_pin, False)
  elif(mode==2):
    print("Shooting all bullets all at once")
    GPIO.output(self.launcher_pin, True)
    time.sleep(3)
    GPIO.output(self.launcher_pin, False)
  else:
    i=0
    while (i < 6):
      GPIO.output(self.launcher_pin, True)
      time.sleep(0.3)
      GPIO.output(self.launcher_pin, False)
      time.sleep(0.7)
      i+=1
      print("Shooting bullet ", i)
if __name__ == "__main__":
  l = Launcher()
  a = input("Enter Shooting mode:\n1) 1 individual bullet\n2) all at once\n3) 1 bullet every second\n\nYour command:")
  l.shoot(int(a))
Save it it launcher.py and run it with sudo python3 launcher.py
Good hunting, cowboy!


